












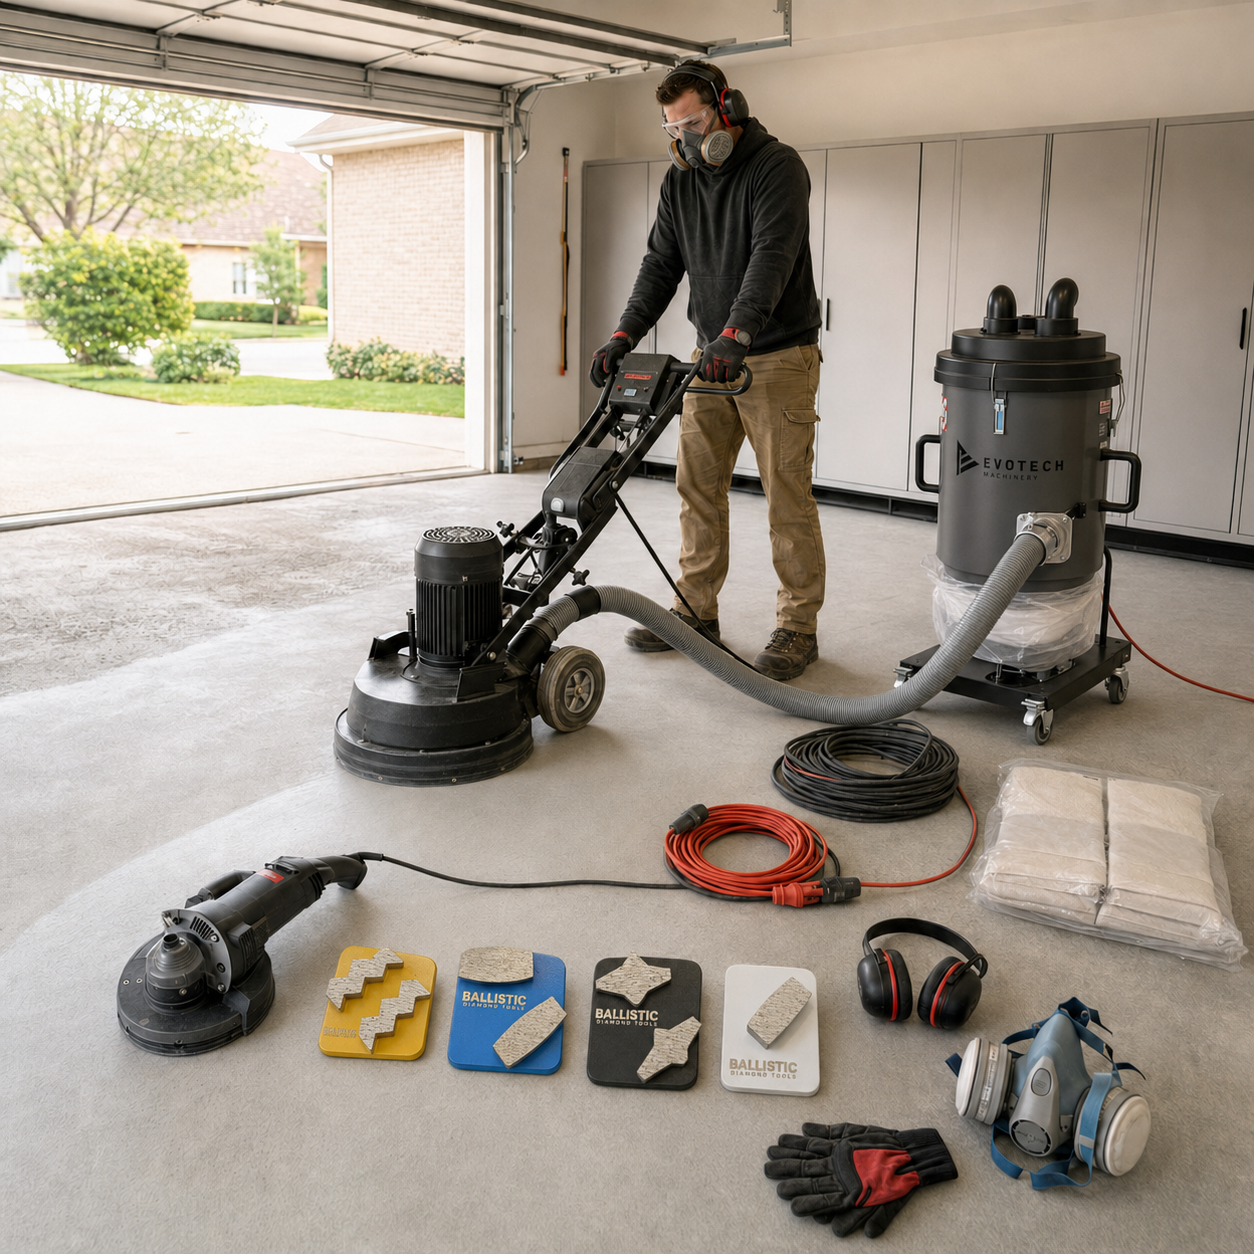
DIY Concrete Grinding: How to Work Out What Equipment and Diamond Tools You Need
DIY concrete grinding can be a practical way to prepare a garage, workshop, patio or small commercial floor—but only if you select the right grinder, diamond tooling and dust-control equipment.
Hiring a grinder without understanding the floor can result in slow progress, damaged concrete, worn-out tools or a surface that still is not ready for coating.
Before ordering equipment, you need to know:
- How many square metres you are grinding
- What is currently on the floor
- How hard the concrete is
- How much material must be removed
- What finish or coating will be applied afterward
- How much edge work is required
- What power is available
- How the concrete dust will be controlled
This guide explains how to work out what you need before beginning a DIY concrete-grinding project.
Step 1: Measure the Floor Area
Start by calculating the total floor area in square metres.
For a rectangular floor:
Length × width = floor area
For example, a garage measuring 6 metres long and 6 metres wide contains:
6 m × 6 m = 36 m²
If the floor has an irregular shape, divide it into smaller rectangles and calculate each section separately.
Example:
- Main floor: 6 m × 5 m = 30 m²
- Side area: 2 m × 1.5 m = 3 m²
- Total grinding area: 33 m²
Measure the actual floor rather than relying on building plans, particularly if benches, walls, stairs or permanent equipment reduce the workable area.
Add approximately 5–10% when planning for overlaps, additional passes and difficult sections.
Step 2: Decide What You Are Trying to Achieve
“Grinding the floor” can mean several different things.
Your objective determines the equipment, diamond grit and number of passes required.
Preparing Concrete for a New Coating
If you are preparing bare concrete for epoxy or another coating, the goal is generally to:
- Remove laitance and weak surface material
- Remove contaminants
- Open the concrete surface
- Produce a consistent mechanical profile
- Leave the floor clean and ready for the specified primer
This may require one main grinding stage followed by detailed edge work, depending on the floor and coating specification.
Removing an Existing Coating
If the floor contains epoxy, paint, glue or waterproofing, you may need specialised coating-removal tools before grinding the exposed concrete.
Thick or flexible materials may require PCD tooling. Standard metal-bond diamonds can clog, glaze or smear when used on unsuitable coatings.
Levelling High Spots
Removing isolated high spots is different from making an entire slab level.
A concrete grinder can reduce minor high areas, but correcting major slab variations may require:
- Larger equipment
- Repeated grinding passes
- Scarifying
- Concrete repair
- Levelling compounds
- Professional assessment
Grinding the entire floor down to match one low spot can remove excessive concrete and expose aggregate.
Polishing Concrete
Concrete polishing is not achieved by completing one pass with a fine diamond tool.
A polished-concrete system normally involves multiple metal and resin diamond stages, repairs, densifier and controlled refinement. DIY polishing requires substantially more equipment, time and experience than basic coating preparation.
Step 3: Identify What Is on the Floor
Inspect the floor carefully before selecting tooling.
Look for:
- Bare concrete
- Paint
- Epoxy
- Tile adhesive
- Carpet glue
- Vinyl adhesive
- Waterproofing membrane
- Concrete sealer
- Levelling compound
- Oil or grease
- Curing compound
- Previous repairs
Do not assume that every grey surface is bare concrete. Thin sealers and clear coatings can be difficult to see.
A small test grind in an inconspicuous area can help determine how the material responds.
If the coating becomes soft, sticky or smears under the grinder, stop. Continuing with conventional diamond tools may clog the segments and spread the material across the floor.
Older coatings, adhesives and construction materials may contain hazardous substances. Arrange appropriate testing if the material is unknown.
Step 4: Choose the Correct Grinder Size
Grinder selection should be based on floor area, access and the amount of material being removed.
Hand Grinder
A hand grinder is useful for:
- Edges
- Corners
- Stairs
- Doorways
- Small high spots
- Areas around fixtures
- Sections inaccessible to a floor grinder
It is not an efficient substitute for a floor grinder across an entire garage. Hand grinding a large floor is slow, physically demanding and more likely to produce an uneven result.
Small Single-Head Floor Grinder
A small single-head grinder may be suitable for:
- Small rooms
- Tight access
- Minor preparation work
- Light coating removal
- Small residential projects
These machines are easy to transport, but their lower weight and smaller grinding width can reduce productivity.
Planetary Floor Grinder
A planetary grinder is generally more suitable for:
- Garages
- Workshops
- Larger rooms
- Coating preparation
- More consistent surface profiling
- Projects requiring multiple grinding stages
A heavier grinder usually produces more consistent contact and higher productivity, but it may require higher-capacity power, specialised transport and greater operator control.
Large Three-Phase Grinder
Large industrial grinders are designed for substantial commercial floors and high production rates.
They may be unnecessary for a small DIY project and can require:
- Three-phase power
- Heavy-duty dust extraction
- Mechanical loading equipment
- Experienced operation
- Larger quantities of tooling
Bigger is not always better. The grinder must suit the area, power supply, access and operator experience.
General Grinder Selection Guide
| Floor size | Practical starting option |
|---|---|
| Edges or isolated repairs | Hand grinder |
| Up to approximately 15 m² | Small floor grinder plus hand grinder |
| Approximately 15–50 m² | Medium floor grinder plus hand grinder |
| Approximately 50–150 m² | Medium or larger planetary grinder |
| More than 150 m² | Professional or industrial grinding setup |
These figures are a starting guide only. A thick coating or badly damaged floor may require heavier equipment regardless of the area.
Step 5: Check the Available Power
Confirm the machine’s electrical requirements before hiring or purchasing it.
Check:
- Voltage
- Plug type
- Current requirement
- Single-phase or three-phase supply
- Recommended circuit capacity
- Extension-lead requirements
- Dust-extractor power requirements
The grinder and dust extractor may need separate electrical circuits. Plugging both machines into the same overloaded circuit can repeatedly trip the power and delay the job.
Use heavy-duty extension leads of the correct capacity. Long, undersized leads can cause voltage drop, overheating and poor machine performance.
Do not assume a standard household power point can operate every concrete grinder.
Step 6: Choose the Correct Diamond Tool
Selecting the correct diamond tool involves more than choosing a grit number.
You must consider:
- Concrete hardness
- Bond hardness
- Coating type
- Required removal rate
- Grinder make and model
- Tooling connection
- Required final profile
Diamond Grit
Lower grit numbers are generally more aggressive.
A simplified guide is:
| Grit range | General purpose |
|---|---|
| Very coarse | Heavy grinding and aggressive material removal |
| Coarse | General concrete grinding and coating preparation |
| Medium | Refining coarse scratches and lighter preparation |
| Fine | Later refinement stages—not heavy removal |
A higher grit number will not remove thick coatings or high spots efficiently. Starting too fine often wastes time and causes the tools to glaze.
The final grit should also suit the coating or finish being installed. Always check the product manufacturer’s current preparation requirements.
Bond Hardness
The bond controls how quickly fresh diamonds are exposed.
The basic rule is:
- Hard concrete generally requires a soft-bond diamond tool.
- Soft or abrasive concrete generally requires a hard-bond diamond tool.
Using the wrong bond can produce slow cutting, glazing or extremely rapid tool wear.
If you do not know the concrete hardness, describe the slab and intended application to the tooling supplier. A test area is still the best way to confirm performance.
Step 7: Determine Whether You Need PCD Tools
PCD tools are designed for aggressive coating removal.
They may be suitable for:
- Thick epoxy
- Heavy floor paint
- Adhesive
- Glue
- Waterproofing membranes
- Multiple coating layers
PCD tools scrape and lift material rather than grinding it in the same way as conventional metal-bond diamonds.
They can also gouge exposed concrete if used incorrectly.
For many coating-removal projects, the process is:
- Remove the bulk coating with suitable PCD tooling.
- Change to metal-bond diamond shoes.
- Remove remaining residue.
- Refine the scratches.
- Produce the profile needed for the new coating.
Do not automatically order the most aggressive PCD tool available. The correct configuration depends on the coating, concrete and grinder.
Step 8: Work Out How Many Diamond Tools You Need
Floor grinders normally require a complete matching set of tools.
The number of shoes depends on the machine. A grinder may use three, six, nine or more grinding shoes at one time.
Before ordering, confirm:
- Grinder make and model
- Tooling connection
- Number of grinding heads
- Number of tool positions
- Head rotation
- Whether directional left- and right-hand PCD tools are required
Do not mix different grits or bond hardnesses on the same grinding stage unless the machine or tooling system specifically calls for it.
Should You Order a Spare Set?
For a small, straightforward bare-concrete floor, one correctly selected set may complete the project—but there is no reliable universal coverage figure.
Tool life changes significantly according to:
- Concrete abrasiveness
- Grinder weight
- Operator technique
- Floor contamination
- Coating thickness
- Tooling bond
- Segment size
- Wet or dry operation
If the project has a fixed completion date, remote location or uncertain concrete, having a spare set can prevent an unfinished floor and another hire period.
The hard truth is that buying too little tooling can cost more than carrying a spare. An additional day of machine hire and lost labour can exceed the value of another tool set.
Step 9: Calculate the Number of Grinding Passes
Grinding calculations should be based on the number of full-floor stages—not only the floor area.
Use this formula:
Floor area × number of full passes = total pass area
For example, a 36 m² garage requiring three full grinding stages involves:
36 m² × 3 = 108 m² of grinding passes
This does not mean you need 108 m² of flooring material. It shows the amount of machine coverage required.
You may also need extra passes for:
- High spots
- Hard concrete sections
- Remaining coating
- Doorways
- Repairs
- Overlapping runs
- Removing scratches from the previous grit
A floor that requires several stages can take much longer than its square-metre measurement suggests.
Step 10: Allow for Edge Grinding
The main floor grinder will not reach tightly against walls, corners, posts and some doorways.
Measure the perimeter:
Length + length + width + width = perimeter
For a 6 m × 6 m garage:
6 + 6 + 6 + 6 = 24 linear metres of edges
Additional edge work may be required around:
- Columns
- Stairs
- Drains
- Machinery bases
- Floor penetrations
- Internal walls
- Cabinets
- Door frames
You will generally need:
- A suitable hand grinder
- Dust shroud
- Correct cup wheel
- Edge-compatible dust hose
- Suitable dust extractor
- Knee protection
Edge work often takes longer than DIY users expect. It should be included in the equipment-hire period.
Step 11: Select a Suitable Cup Wheel
Cup wheels are commonly used with hand grinders for edges and small areas.
Choose the wheel according to the application:
- General-purpose diamond cup wheel for bare concrete
- Coarse cup wheel for aggressive grinding
- PCD cup wheel for suitable coating-removal applications
- Finer cup wheel for controlled scratch refinement
Confirm that the cup wheel:
- Fits the grinder
- Has the correct bore or thread
- Is rated for the grinder’s speed
- Fits inside the dust shroud
- Is suitable for the material being removed
Never use a cup wheel above its rated maximum speed.
Step 12: Use Proper Dust Extraction
Concrete grinding can generate large amounts of respirable crystalline silica dust. A basic domestic or workshop vacuum is not suitable.
For dry concrete grinding, use a properly selected H-class dust extractor appropriate for the grinder and application.
The dust extractor should have:
- Suitable H-class filtration
- Adequate airflow
- Automatic or effective filter cleaning
- Correct hose diameter
- Secure grinder connection
- Safe dust collection
- Suitable disposal bags
The extractor must be large enough to keep up with the grinder. A small vacuum connected to a high-production floor grinder may provide poor dust capture even if the hose fits.
A pre-separator may also be useful on larger or dust-heavy projects because it can capture much of the material before it reaches the extractor filters.
Step 13: Estimate Dust Bags and Disposal Requirements
The amount of dust produced depends on:
- Floor area
- Grinding depth
- Concrete hardness
- Existing coatings
- Number of passes
- Grinder size
- Dust-collection system
There is no accurate universal “one bag per square metre” calculation.
For a small garage, keep multiple correctly sized disposal bags available rather than relying on one bag. Coating fragments and thick concrete removal can fill bags much faster than light surface preparation.
Dust bags should not be packed until they are excessively heavy or difficult to seal safely.
Confirm how grinding dust and removed coatings must be disposed of in your area, particularly if hazardous contamination may be present.
Step 14: Estimate How Long the Job Will Take
Grinding time cannot be calculated accurately from floor area alone.
A clean 36 m² garage with bare, consistent concrete may be much faster than a 20 m² floor covered in several layers of glue.
Allow time for:
- Equipment collection and transport
- Site setup
- Testing the tooling
- Main floor grinding
- Edge grinding
- Tool changes
- Filter maintenance
- Dust-bag changes
- Crack repairs
- Detailed vacuuming
- Equipment cleaning
- Returning hired machinery
For a first-time DIY user, it is safer to allow more time than the equipment supplier’s ideal production rate.
Quoted machine production rates usually assume correct tooling, suitable concrete and an experienced operator. They should not be treated as guaranteed DIY output.
Example: What You May Need for a 36 m² Garage
Assume the garage is 6 m × 6 m, has bare concrete and will receive an epoxy coating.
A typical starting equipment list may include:
- Medium floor grinder
- Complete set of correctly matched metal-bond diamonds
- Hand grinder
- Dust shroud
- Diamond cup wheel
- Suitable H-class dust extractor
- Correct dust hose and adapters
- Heavy-duty extension leads
- Multiple dust-collection bags
- Required personal protective equipment
- Floor-repair materials where necessary
Calculations:
- Main floor area: 36 m²
- Additional 10% allowance: 3.6 m²
- Planning area: approximately 40 m²
- Floor perimeter: 24 linear metres
- Two full-floor passes: 72 m² of machine coverage
- Two passes plus 10% allowance: approximately 80 m² of planned grinding coverage
The required diamond bond and grit still depend on the concrete and the coating manufacturer’s preparation specification.
DIY Concrete-Grinding Checklist
Before starting, confirm the following:
Floor Information
- Total square metres
- Total edge length
- Existing coating or contamination
- Concrete condition
- Cracks and repairs
- High and low areas
- Required final finish
Equipment
- Correct floor grinder
- Hand grinder
- Dust shrouds
- H-class dust extractor
- Pre-separator if required
- Correct hoses and adapters
- Suitable electrical leads
Tooling
- Correct tooling connection
- Complete machine set
- Correct diamond grit
- Correct bond hardness
- PCD tools if required
- Correct cup wheel
- Spare tooling where appropriate
Safety
- Suitable respirator
- Hearing protection
- Safety glasses
- Gloves
- Steel-cap boots
- Knee protection
- Controlled work area
- Safe electrical setup
- Dust-disposal plan
When DIY Grinding May Not Be the Best Option
DIY grinding may not be cost-effective when the floor has:
- Thick or unknown coatings
- Major slab unevenness
- Extensive cracking
- Moisture problems
- Heavy oil contamination
- Soft or damaged concrete
- Hazardous materials
- Large commercial areas
- Limited electrical power
- A decorative polished-concrete finish requirement
Professional grinding can initially appear more expensive, but incorrect DIY preparation can lead to coating failure, another equipment-hire period and the need to grind the floor again.
If the floor condition is uncertain, send clear photographs and complete a small test area before committing to the entire job.
DIY Concrete-Grinding Equipment from Diamond Tool Warehouse
Diamond Tool Warehouse supplies professional equipment and tooling for DIY and trade concrete-grinding projects, including:
- Diamond grinding shoes
- PCD coating-removal tools
- Diamond cup wheels
- Floor grinders
- Hand grinders and dust shrouds
- H-class dust extractors
- Dust hoses and adapters
- Continuous dust bags
- Concrete preparation equipment
To help identify the correct setup, provide:
- Floor area in square metres
- Photographs of the floor
- Description of existing coatings
- Grinder make and model
- Available power
- Required finished result
- Product being installed afterward
The more accurate the project information, the easier it is to avoid hiring or purchasing the wrong equipment.
Final Takeaway
To work out what you need for DIY concrete grinding, begin with the floor—not the machine.
Measure the area and edges, identify what is on the concrete, decide what finish is required and confirm the available power. Then match the grinder, tooling and dust extractor to those conditions.
For most DIY projects, the essential setup includes:
- A correctly sized floor grinder
- A hand grinder for edges
- Diamond tooling matched to the concrete
- PCD tools when suitable for coating removal
- A compatible H-class dust extractor
- Proper safety equipment
- Enough time and spare consumables to complete the job
The cheapest hire package is not necessarily the cheapest way to finish the floor. Correct equipment and tooling can save hours of labour and reduce the risk of having to prepare the concrete twice.
For help working out what you need for your concrete-grinding project, contact Diamond Tool Warehouse with your floor measurements, photographs and required finish.
SEO title: DIY Concrete Grinding: How to Work Out What You Need
Meta description: Planning a DIY concrete-grinding project? Learn how to calculate your floor area, select a grinder, choose diamond tools and arrange safe dust extraction.
Suggested URL: /diy-concrete-grinding-what-equipment-do-i-need
Primary keyword: DIY concrete grinding
Secondary keywords: concrete grinder hire, how to grind concrete, diamond grinding shoes, concrete floor preparation, DIY epoxy floor preparationDIY Concrete Grinding: How to Work Out What Equipment and Diamond Tools You Need
DIY concrete grinding can be a practical way to prepare a garage, workshop, patio or small commercial floor—but only if you select the right grinder, diamond tooling and dust-control equipment.
Hiring a grinder without understanding the floor can result in slow progress, damaged concrete, worn-out tools or a surface that still is not ready for coating.
Before ordering equipment, you need to know:
- How many square metres you are grinding
- What is currently on the floor
- How hard the concrete is
- How much material must be removed
- What finish or coating will be applied afterward
- How much edge work is required
- What power is available
- How the concrete dust will be controlled
This guide explains how to work out what you need before beginning a DIY concrete-grinding project.
Step 1: Measure the Floor Area
Start by calculating the total floor area in square metres.
For a rectangular floor:
Length × width = floor area
For example, a garage measuring 6 metres long and 6 metres wide contains:
6 m × 6 m = 36 m²
If the floor has an irregular shape, divide it into smaller rectangles and calculate each section separately.
Example:
- Main floor: 6 m × 5 m = 30 m²
- Side area: 2 m × 1.5 m = 3 m²
- Total grinding area: 33 m²
Measure the actual floor rather than relying on building plans, particularly if benches, walls, stairs or permanent equipment reduce the workable area.
Add approximately 5–10% when planning for overlaps, additional passes and difficult sections.
Step 2: Decide What You Are Trying to Achieve
“Grinding the floor” can mean several different things.
Your objective determines the equipment, diamond grit and number of passes required.
Preparing Concrete for a New Coating
If you are preparing bare concrete for epoxy or another coating, the goal is generally to:
- Remove laitance and weak surface material
- Remove contaminants
- Open the concrete surface
- Produce a consistent mechanical profile
- Leave the floor clean and ready for the specified primer
This may require one main grinding stage followed by detailed edge work, depending on the floor and coating specification.
Removing an Existing Coating
If the floor contains epoxy, paint, glue or waterproofing, you may need specialised coating-removal tools before grinding the exposed concrete.
Thick or flexible materials may require PCD tooling. Standard metal-bond diamonds can clog, glaze or smear when used on unsuitable coatings.
Levelling High Spots
Removing isolated high spots is different from making an entire slab level.
A concrete grinder can reduce minor high areas, but correcting major slab variations may require:
- Larger equipment
- Repeated grinding passes
- Scarifying
- Concrete repair
- Levelling compounds
- Professional assessment
Grinding the entire floor down to match one low spot can remove excessive concrete and expose aggregate.
Polishing Concrete
Concrete polishing is not achieved by completing one pass with a fine diamond tool.
A polished-concrete system normally involves multiple metal and resin diamond stages, repairs, densifier and controlled refinement. DIY polishing requires substantially more equipment, time and experience than basic coating preparation.
Step 3: Identify What Is on the Floor
Inspect the floor carefully before selecting tooling.
Look for:
- Bare concrete
- Paint
- Epoxy
- Tile adhesive
- Carpet glue
- Vinyl adhesive
- Waterproofing membrane
- Concrete sealer
- Levelling compound
- Oil or grease
- Curing compound
- Previous repairs
Do not assume that every grey surface is bare concrete. Thin sealers and clear coatings can be difficult to see.
A small test grind in an inconspicuous area can help determine how the material responds.
If the coating becomes soft, sticky or smears under the grinder, stop. Continuing with conventional diamond tools may clog the segments and spread the material across the floor.
Older coatings, adhesives and construction materials may contain hazardous substances. Arrange appropriate testing if the material is unknown.
Step 4: Choose the Correct Grinder Size
Grinder selection should be based on floor area, access and the amount of material being removed.
Hand Grinder
A hand grinder is useful for:
- Edges
- Corners
- Stairs
- Doorways
- Small high spots
- Areas around fixtures
- Sections inaccessible to a floor grinder
It is not an efficient substitute for a floor grinder across an entire garage. Hand grinding a large floor is slow, physically demanding and more likely to produce an uneven result.
Small Single-Head Floor Grinder
A small single-head grinder may be suitable for:
- Small rooms
- Tight access
- Minor preparation work
- Light coating removal
- Small residential projects
These machines are easy to transport, but their lower weight and smaller grinding width can reduce productivity.
Planetary Floor Grinder
A planetary grinder is generally more suitable for:
- Garages
- Workshops
- Larger rooms
- Coating preparation
- More consistent surface profiling
- Projects requiring multiple grinding stages
A heavier grinder usually produces more consistent contact and higher productivity, but it may require higher-capacity power, specialised transport and greater operator control.
Large Three-Phase Grinder
Large industrial grinders are designed for substantial commercial floors and high production rates.
They may be unnecessary for a small DIY project and can require:
- Three-phase power
- Heavy-duty dust extraction
- Mechanical loading equipment
- Experienced operation
- Larger quantities of tooling
Bigger is not always better. The grinder must suit the area, power supply, access and operator experience.
General Grinder Selection Guide
| Floor size | Practical starting option |
|---|---|
| Edges or isolated repairs | Hand grinder |
| Up to approximately 15 m² | Small floor grinder plus hand grinder |
| Approximately 15–50 m² | Medium floor grinder plus hand grinder |
| Approximately 50–150 m² | Medium or larger planetary grinder |
| More than 150 m² | Professional or industrial grinding setup |
These figures are a starting guide only. A thick coating or badly damaged floor may require heavier equipment regardless of the area.
Step 5: Check the Available Power
Confirm the machine’s electrical requirements before hiring or purchasing it.
Check:
- Voltage
- Plug type
- Current requirement
- Single-phase or three-phase supply
- Recommended circuit capacity
- Extension-lead requirements
- Dust-extractor power requirements
The grinder and dust extractor may need separate electrical circuits. Plugging both machines into the same overloaded circuit can repeatedly trip the power and delay the job.
Use heavy-duty extension leads of the correct capacity. Long, undersized leads can cause voltage drop, overheating and poor machine performance.
Do not assume a standard household power point can operate every concrete grinder.
Step 6: Choose the Correct Diamond Tool
Selecting the correct diamond tool involves more than choosing a grit number.
You must consider:
- Concrete hardness
- Bond hardness
- Coating type
- Required removal rate
- Grinder make and model
- Tooling connection
- Required final profile
Diamond Grit
Lower grit numbers are generally more aggressive.
A simplified guide is:
| Grit range | General purpose |
|---|---|
| Very coarse | Heavy grinding and aggressive material removal |
| Coarse | General concrete grinding and coating preparation |
| Medium | Refining coarse scratches and lighter preparation |
| Fine | Later refinement stages—not heavy removal |
A higher grit number will not remove thick coatings or high spots efficiently. Starting too fine often wastes time and causes the tools to glaze.
The final grit should also suit the coating or finish being installed. Always check the product manufacturer’s current preparation requirements.
Bond Hardness
The bond controls how quickly fresh diamonds are exposed.
The basic rule is:
- Hard concrete generally requires a soft-bond diamond tool.
- Soft or abrasive concrete generally requires a hard-bond diamond tool.
Using the wrong bond can produce slow cutting, glazing or extremely rapid tool wear.
If you do not know the concrete hardness, describe the slab and intended application to the tooling supplier. A test area is still the best way to confirm performance.
Step 7: Determine Whether You Need PCD Tools
PCD tools are designed for aggressive coating removal.
They may be suitable for:
- Thick epoxy
- Heavy floor paint
- Adhesive
- Glue
- Waterproofing membranes
- Multiple coating layers
PCD tools scrape and lift material rather than grinding it in the same way as conventional metal-bond diamonds.
They can also gouge exposed concrete if used incorrectly.
For many coating-removal projects, the process is:
- Remove the bulk coating with suitable PCD tooling.
- Change to metal-bond diamond shoes.
- Remove remaining residue.
- Refine the scratches.
- Produce the profile needed for the new coating.
Do not automatically order the most aggressive PCD tool available. The correct configuration depends on the coating, concrete and grinder.
Step 8: Work Out How Many Diamond Tools You Need
Floor grinders normally require a complete matching set of tools.
The number of shoes depends on the machine. A grinder may use three, six, nine or more grinding shoes at one time.
Before ordering, confirm:
- Grinder make and model
- Tooling connection
- Number of grinding heads
- Number of tool positions
- Head rotation
- Whether directional left- and right-hand PCD tools are required
Do not mix different grits or bond hardnesses on the same grinding stage unless the machine or tooling system specifically calls for it.
Should You Order a Spare Set?
For a small, straightforward bare-concrete floor, one correctly selected set may complete the project—but there is no reliable universal coverage figure.
Tool life changes significantly according to:
- Concrete abrasiveness
- Grinder weight
- Operator technique
- Floor contamination
- Coating thickness
- Tooling bond
- Segment size
- Wet or dry operation
If the project has a fixed completion date, remote location or uncertain concrete, having a spare set can prevent an unfinished floor and another hire period.
The hard truth is that buying too little tooling can cost more than carrying a spare. An additional day of machine hire and lost labour can exceed the value of another tool set.
Step 9: Calculate the Number of Grinding Passes
Grinding calculations should be based on the number of full-floor stages—not only the floor area.
Use this formula:
Floor area × number of full passes = total pass area
For example, a 36 m² garage requiring three full grinding stages involves:
36 m² × 3 = 108 m² of grinding passes
This does not mean you need 108 m² of flooring material. It shows the amount of machine coverage required.
You may also need extra passes for:
- High spots
- Hard concrete sections
- Remaining coating
- Doorways
- Repairs
- Overlapping runs
- Removing scratches from the previous grit
A floor that requires several stages can take much longer than its square-metre measurement suggests.
Step 10: Allow for Edge Grinding
The main floor grinder will not reach tightly against walls, corners, posts and some doorways.
Measure the perimeter:
Length + length + width + width = perimeter
For a 6 m × 6 m garage:
6 + 6 + 6 + 6 = 24 linear metres of edges
Additional edge work may be required around:
- Columns
- Stairs
- Drains
- Machinery bases
- Floor penetrations
- Internal walls
- Cabinets
- Door frames
You will generally need:
- A suitable hand grinder
- Dust shroud
- Correct cup wheel
- Edge-compatible dust hose
- Suitable dust extractor
- Knee protection
Edge work often takes longer than DIY users expect. It should be included in the equipment-hire period.
Step 11: Select a Suitable Cup Wheel
Cup wheels are commonly used with hand grinders for edges and small areas.
Choose the wheel according to the application:
- General-purpose diamond cup wheel for bare concrete
- Coarse cup wheel for aggressive grinding
- PCD cup wheel for suitable coating-removal applications
- Finer cup wheel for controlled scratch refinement
Confirm that the cup wheel:
- Fits the grinder
- Has the correct bore or thread
- Is rated for the grinder’s speed
- Fits inside the dust shroud
- Is suitable for the material being removed
Never use a cup wheel above its rated maximum speed.
Step 12: Use Proper Dust Extraction
Concrete grinding can generate large amounts of respirable crystalline silica dust. A basic domestic or workshop vacuum is not suitable.
For dry concrete grinding, use a properly selected H-class dust extractor appropriate for the grinder and application.
The dust extractor should have:
- Suitable H-class filtration
- Adequate airflow
- Automatic or effective filter cleaning
- Correct hose diameter
- Secure grinder connection
- Safe dust collection
- Suitable disposal bags
The extractor must be large enough to keep up with the grinder. A small vacuum connected to a high-production floor grinder may provide poor dust capture even if the hose fits.
A pre-separator may also be useful on larger or dust-heavy projects because it can capture much of the material before it reaches the extractor filters.
Step 13: Estimate Dust Bags and Disposal Requirements
The amount of dust produced depends on:
- Floor area
- Grinding depth
- Concrete hardness
- Existing coatings
- Number of passes
- Grinder size
- Dust-collection system
There is no accurate universal “one bag per square metre” calculation.
For a small garage, keep multiple correctly sized disposal bags available rather than relying on one bag. Coating fragments and thick concrete removal can fill bags much faster than light surface preparation.
Dust bags should not be packed until they are excessively heavy or difficult to seal safely.
Confirm how grinding dust and removed coatings must be disposed of in your area, particularly if hazardous contamination may be present.
Step 14: Estimate How Long the Job Will Take
Grinding time cannot be calculated accurately from floor area alone.
A clean 36 m² garage with bare, consistent concrete may be much faster than a 20 m² floor covered in several layers of glue.
Allow time for:
- Equipment collection and transport
- Site setup
- Testing the tooling
- Main floor grinding
- Edge grinding
- Tool changes
- Filter maintenance
- Dust-bag changes
- Crack repairs
- Detailed vacuuming
- Equipment cleaning
- Returning hired machinery
For a first-time DIY user, it is safer to allow more time than the equipment supplier’s ideal production rate.
Quoted machine production rates usually assume correct tooling, suitable concrete and an experienced operator. They should not be treated as guaranteed DIY output.
Example: What You May Need for a 36 m² Garage
Assume the garage is 6 m × 6 m, has bare concrete and will receive an epoxy coating.
A typical starting equipment list may include:
- Medium floor grinder
- Complete set of correctly matched metal-bond diamonds
- Hand grinder
- Dust shroud
- Diamond cup wheel
- Suitable H-class dust extractor
- Correct dust hose and adapters
- Heavy-duty extension leads
- Multiple dust-collection bags
- Required personal protective equipment
- Floor-repair materials where necessary
Calculations:
- Main floor area: 36 m²
- Additional 10% allowance: 3.6 m²
- Planning area: approximately 40 m²
- Floor perimeter: 24 linear metres
- Two full-floor passes: 72 m² of machine coverage
- Two passes plus 10% allowance: approximately 80 m² of planned grinding coverage
The required diamond bond and grit still depend on the concrete and the coating manufacturer’s preparation specification.
DIY Concrete-Grinding Checklist
Before starting, confirm the following:
Floor Information
- Total square metres
- Total edge length
- Existing coating or contamination
- Concrete condition
- Cracks and repairs
- High and low areas
- Required final finish
Equipment
- Correct floor grinder
- Hand grinder
- Dust shrouds
- H-class dust extractor
- Pre-separator if required
- Correct hoses and adapters
- Suitable electrical leads
Tooling
- Correct tooling connection
- Complete machine set
- Correct diamond grit
- Correct bond hardness
- PCD tools if required
- Correct cup wheel
- Spare tooling where appropriate
Safety
- Suitable respirator
- Hearing protection
- Safety glasses
- Gloves
- Steel-cap boots
- Knee protection
- Controlled work area
- Safe electrical setup
- Dust-disposal plan
When DIY Grinding May Not Be the Best Option
DIY grinding may not be cost-effective when the floor has:
- Thick or unknown coatings
- Major slab unevenness
- Extensive cracking
- Moisture problems
- Heavy oil contamination
- Soft or damaged concrete
- Hazardous materials
- Large commercial areas
- Limited electrical power
- A decorative polished-concrete finish requirement
Professional grinding can initially appear more expensive, but incorrect DIY preparation can lead to coating failure, another equipment-hire period and the need to grind the floor again.
If the floor condition is uncertain, send clear photographs and complete a small test area before committing to the entire job.
DIY Concrete-Grinding Equipment from Diamond Tool Warehouse
Diamond Tool Warehouse supplies professional equipment and tooling for DIY and trade concrete-grinding projects, including:
- Diamond grinding shoes
- PCD coating-removal tools
- Diamond cup wheels
- Floor grinders
- Hand grinders and dust shrouds
- H-class dust extractors
- Dust hoses and adapters
- Continuous dust bags
- Concrete preparation equipment
To help identify the correct setup, provide:
- Floor area in square metres
- Photographs of the floor
- Description of existing coatings
- Grinder make and model
- Available power
- Required finished result
- Product being installed afterward
The more accurate the project information, the easier it is to avoid hiring or purchasing the wrong equipment.
Final Takeaway
To work out what you need for DIY concrete grinding, begin with the floor—not the machine.
Measure the area and edges, identify what is on the concrete, decide what finish is required and confirm the available power. Then match the grinder, tooling and dust extractor to those conditions.
For most DIY projects, the essential setup includes:
- A correctly sized floor grinder
- A hand grinder for edges
- Diamond tooling matched to the concrete
- PCD tools when suitable for coating removal
- A compatible H-class dust extractor
- Proper safety equipment
- Enough time and spare consumables to complete the job
The cheapest hire package is not necessarily the cheapest way to finish the floor. Correct equipment and tooling can save hours of labour and reduce the risk of having to prepare the concrete twice.
For help working out what you need for your concrete-grinding project, contact Diamond Tool Warehouse with your floor measurements, photographs and required finish.