











A concrete coating is only as reliable as the surface underneath it.
When epoxy, polyurethane, polyaspartic or waterproofing systems peel, blister or delaminate, the coating itself is often blamed. In many cases, however, the real cause is inadequate concrete preparation.
Professional surface preparation is not an optional extra. It creates the clean, sound and properly profiled surface needed for the coating system to bond correctly.
This guide covers the most common preparation mistakes, the warning signs of coating failure and how contractors can reduce the risk of costly repairs.
Why Surface Preparation Matters
Concrete may appear solid and clean while still containing materials that interfere with adhesion.
Possible contaminants include:
- Curing compounds
- Concrete sealers
- Oil and grease
- Paint
- Adhesive residue
- Dust
- Laitance
- Weak or deteriorated concrete
- Cleaning chemicals
- Moisture-related deposits
Applying a coating over these materials can prevent it from bonding directly to sound concrete.
Surface preparation should remove contamination and weak material while creating a suitable mechanical profile. The exact preparation requirement depends on the coating system and the condition of the floor.
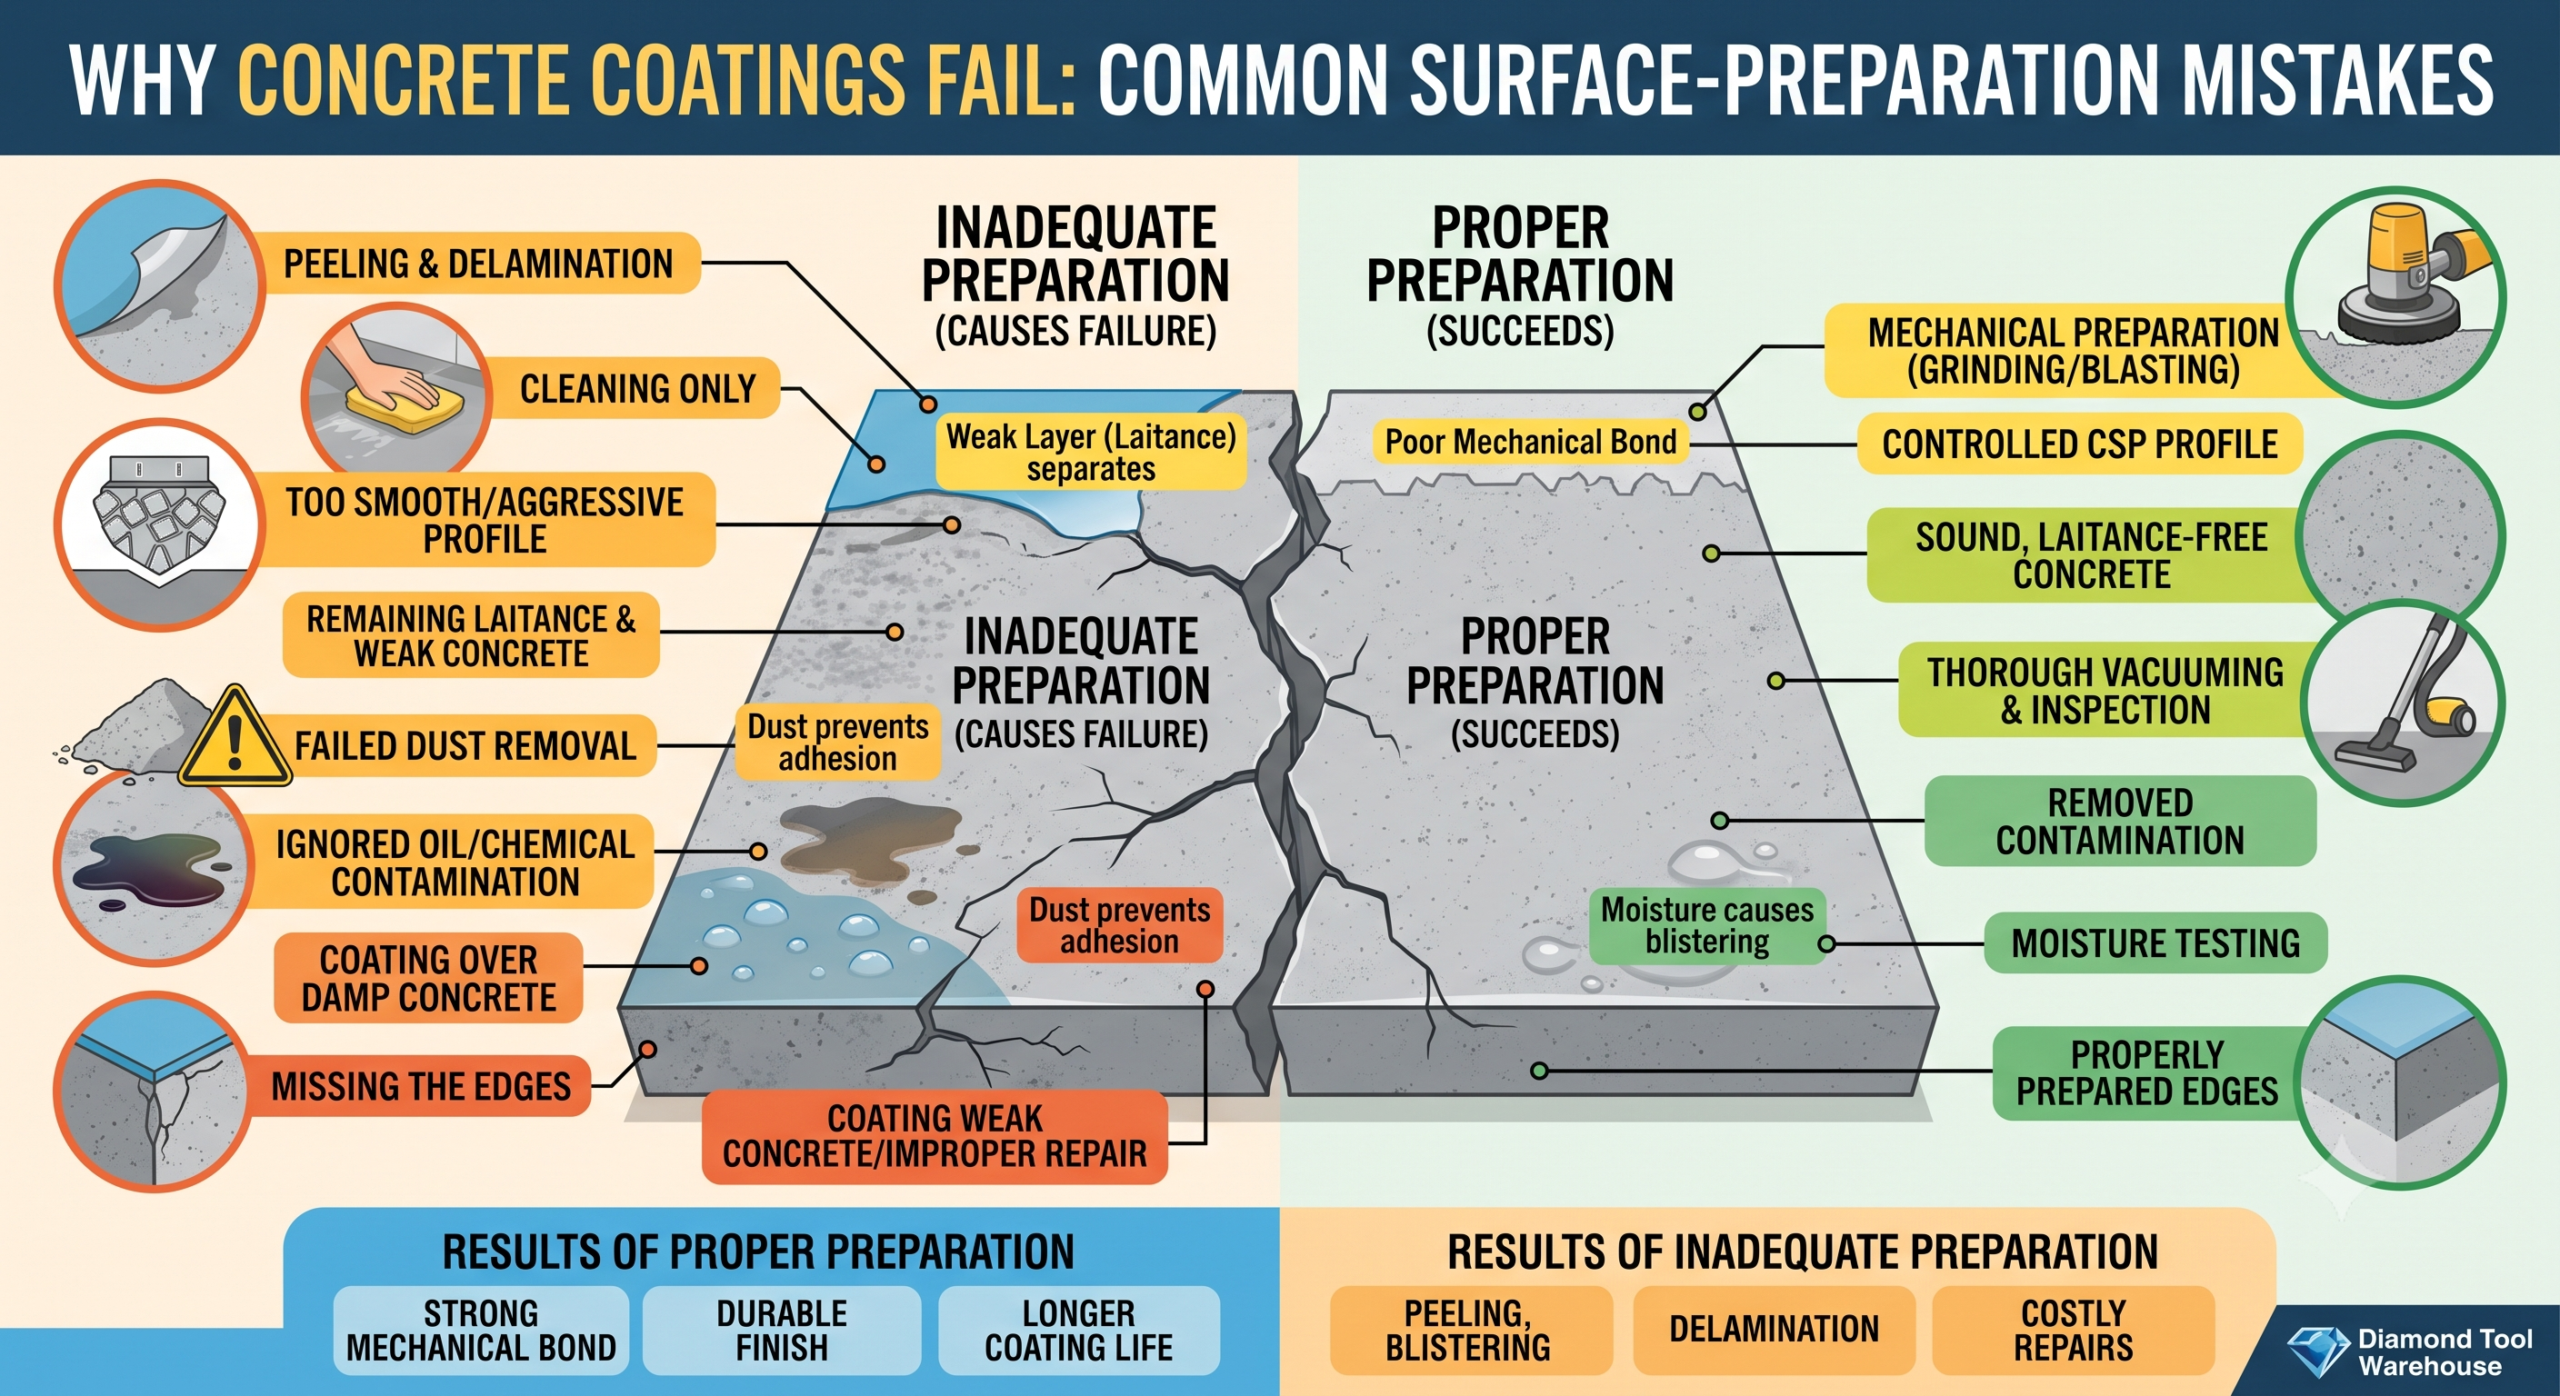
Mistake 1: Cleaning the Floor Without Mechanically Preparing It
Washing, degreasing or acid cleaning a floor is not the same as mechanically preparing it.
Cleaning may remove loose dirt and some surface contamination, but it usually does not provide the controlled surface profile required by professional resin flooring systems.
Mechanical preparation methods can include:
- Diamond grinding
- Shot blasting
- Scarifying
- PCD coating removal
- Hand grinding around edges and penetrations
The correct method will depend on the concrete, existing surface materials and required Concrete Surface Profile.
Mistake 2: Using the Wrong Diamond Tooling
Not every diamond grinding shoe is suitable for every floor.
Important factors include:
- Concrete hardness
- Bond hardness
- Diamond grit
- Segment design
- Grinder weight and power
- Existing coatings
- Required removal rate
- Desired surface profile
Hard concrete generally requires softer-bond tooling so the matrix can expose fresh diamonds. Soft or abrasive concrete generally requires a harder bond to control segment wear.
Using the wrong bond may cause glazing, slow production or excessive tooling consumption.
Conventional metal-bond diamonds may also be inefficient when removing thick adhesives, membranes or heavy coatings. These applications may require PCD tooling or another specialised removal tool.
Mistake 3: Leaving Laitance on the Surface
Laitance is a weak layer of cement fines that can form on the surface of concrete.
A coating applied over laitance may initially look acceptable, but its bond is limited by the strength of the weak layer underneath. If the laitance separates from the slab, the coating comes away with it.
Mechanical preparation should continue until weak surface material has been removed and sound concrete is exposed.
A floor is not properly prepared simply because it looks evenly scratched.
Mistake 4: Failing to Remove All Dust
Concrete dust acts as a bond breaker between the primer and the prepared surface.
After grinding, the floor may appear clean while still holding fine dust inside the surface profile, cracks and pores. Sweeping alone is rarely sufficient.
Use a suitable industrial H-class dust extractor during dry grinding and thoroughly vacuum the floor before applying the coating.
Pay particular attention to:
- Corners
- Edges
- Saw cuts
- Cracks
- Control joints
- Floor-to-wall junctions
- Bolt holes and penetrations
Avoid blowing concrete dust around the work area with compressed air.
Mistake 5: Ignoring Oil and Chemical Contamination
Grinding the visible surface does not always remove contamination that has penetrated deeply into the concrete.
Oil, grease and chemicals may remain inside the slab and later interfere with coating adhesion. Contamination can also be spread across the floor when unsuitable grinding methods are used.
Heavily contaminated areas may require:
- Degreasing
- Repeated mechanical preparation
- Localised concrete removal
- Specialised primers
- Testing before installation
If contamination cannot be removed reliably, the affected concrete may need to be replaced.
Mistake 6: Applying Coatings Over Damp Concrete
Moisture can move through concrete even when the surface appears dry.
Possible sources include:
- Moisture within newly placed concrete
- Ground moisture
- Missing or damaged vapour barriers
- Plumbing leaks
- External water entry
- Hydrostatic pressure
- Washing completed shortly before application
Excess moisture can cause:
- Blistering
- Bubbling
- Delamination
- Discolouration
- Cloudiness
- Osmotic blistering
- Loss of adhesion
Do not rely on appearance or touch alone. Test the concrete using a method appropriate for the specified flooring system, and follow the coating manufacturer’s moisture limits.
A moisture-tolerant primer can help in certain conditions, but it is not a universal solution for active water pressure or uncontrolled moisture.
Mistake 7: Producing the Wrong Surface Profile
Different coatings require different surface profiles.
A thin coating may not hide deep grinder marks. A high-build system may require a more aggressive profile to achieve reliable adhesion.
If the profile is too smooth, the coating may not develop sufficient mechanical bond. If it is too aggressive, additional material may be required to fill the surface and achieve the desired finish.
Before starting, confirm:
- The coating manufacturer’s required profile
- The specified application thickness
- Whether the system includes a primer
- The condition and strength of the concrete
- The final appearance required
The objective is not to grind as aggressively as possible. It is to create the correct profile for the selected system.
Mistake 8: Missing the Edges
The main floor may be prepared correctly while edges, corners and areas around fixtures receive limited attention.
These locations are common starting points for coating failure.
Use suitable hand grinders and edge tooling to prepare:
- Walls and columns
- Doorways
- Stairs
- Drains
- Penetrations
- Machinery bases
- Floor joints
- Areas the main grinder cannot reach
Edge preparation should produce a profile that is reasonably consistent with the main floor.
Mistake 9: Coating Weak or Damaged Concrete
A coating system cannot strengthen badly deteriorated concrete unless it has been specifically designed and engineered to do so.
Before coating, inspect the slab for:
- Cracks
- Hollow or delaminated areas
- Spalling
- Rain-damaged concrete
- Soft or dusty surfaces
- Impact damage
- Damaged joints
- Previous repairs
- Low spots that hold water
Weak concrete should be removed or repaired using a compatible method and repair material.
If a pull-off failure occurs within the concrete rather than at the coating interface, the underlying slab may not have enough strength to support the system.
Mistake 10: Filling Cracks Without Understanding Their Cause
Not every crack should be treated in the same way.
A hairline shrinkage crack is different from an active structural crack or a moving joint. Rigidly filling a moving crack does not prevent future movement; it may simply cause the repair or coating to crack again.
Before repairing, determine whether the crack is:
- Dormant or active
- Structural or non-structural
- Contaminated
- Moisture-bearing
- Part of a designed joint
- Continuing through the slab
Where movement is expected, specialist advice or a flexible treatment may be required.
Mistake 11: Preparing Too Early
Concrete can become contaminated again after preparation.
Other trades may introduce:
- Dust
- Plaster
- Paint
- Silicone
- Oil
- Tyre marks
- Water
- Foot traffic
- Construction debris
Whenever possible, prepare the floor close to the planned coating application. Protect prepared areas and inspect them again immediately before priming.
If there is any doubt about the condition of the floor, vacuum and reassess it before proceeding.
Mistake 12: Ignoring the Product Data Sheet
Experience is valuable, but it does not replace the current technical requirements for the product being installed.
Always check the manufacturer’s documentation for:
- Surface-preparation requirements
- Concrete Surface Profile
- Moisture limits
- Minimum concrete age
- Mixing instructions
- Coverage rates
- Application temperatures
- Recoat windows
- Primer requirements
- Cure times
A method that works for one coating system may not be suitable for another.
Warning Signs of Poor Preparation
Problems may become visible during preparation or shortly after coating.
Warning signs include:
- Grinding tools sliding without cutting
- Uneven scratch patterns
- Remaining glossy patches
- Persistent dust
- Dark oil stains
- Soft or powdery concrete
- Moisture appearing in cracks
- Primer separating or forming beads
- Pinholes or bubbles
- Coating peeling during inspection
Do not cover warning signs and hope the next coat will solve them. Stop, identify the cause and correct the floor before continuing.
A Practical Surface-Preparation Process
Although every project is different, a professional process generally includes:
- Inspect the concrete and identify contamination, damage and moisture risks.
- Review the coating manufacturer’s technical requirements.
- Complete moisture and other required tests.
- Select the correct grinder and diamond tooling.
- Perform a small test area.
- Remove coatings, contamination, laitance and weak concrete.
- Prepare edges, corners and difficult-to-access areas.
- Repair cracks and damaged sections using compatible materials.
- Thoroughly vacuum the floor with suitable dust-extraction equipment.
- Inspect the final surface profile before applying the primer.
Photographing the prepared floor and recording test results can also provide valuable project documentation.
The Real Cost of Poor Preparation
Reducing preparation time may make a quotation look more competitive, but coating failure is far more expensive than preparing the floor correctly the first time.
Failure can result in:
- Return visits
- Removal of the failed coating
- Replacement materials
- Additional labour
- Lost production time
- Damage to the contractor’s reputation
- Disputes over responsibility
- Warranty claims
- Loss of future work
The cost of additional grinding or testing is minor compared with replacing an entire flooring system.
Surface-Preparation Equipment from Diamond Tool Warehouse
Diamond Tool Warehouse supplies professional equipment and tooling for concrete grinding, coating removal and floor preparation, including:
- Diamond grinding shoes
- PCD coating-removal tools
- Cup wheels
- Floor grinders
- Hand-grinding equipment
- H-class dust extractors
- Continuous dust bags
- Edge-grinding tools
- Concrete repair and preparation products
The correct equipment combination depends on the grinder, concrete hardness, existing surface and coating specification.
Final Takeaway
Most concrete coating failures do not begin in the topcoat. They begin underneath it.
A floor that looks clean is not necessarily ready to coat. The concrete must be sound, properly profiled, free from contamination and within the moisture limits of the selected system.
Professional surface preparation requires the right inspection, testing, machinery, diamond tooling and dust extraction. Done properly, it creates the foundation for a flooring system that performs as intended.
For help selecting concrete grinding and surface-preparation equipment, contact the team at Diamond Tool Warehouse.