











The Complete Guide to Servicing Your H-Class Dust Extractor
Practical Maintenance Tips, Daily Checklists, FAQs, and Best Practices
Whether you grind concrete, remove coatings, polish floors, chase walls, or cut masonry, your H-Class dust extractor is one of the most important pieces of equipment on site. It protects your health, captures hazardous respirable crystalline silica (RCS), keeps your workplace cleaner, and helps your grinders perform at their best.
Unfortunately, many contractors spend thousands of dollars on grinders and diamond tooling while giving very little attention to the machine that protects both them and their investment.
Regular maintenance isn’t just about extending the life of your vacuum. It also helps maintain suction, reduces costly repairs, improves dust collection, and ensures your machine continues to operate safely.
Why Servicing Your H-Class Vacuum Is So Important
A well-maintained H-Class vacuum provides:
- Maximum dust extraction
- Better grinder performance
- Longer filter life
- Reduced motor wear
- Lower repair costs
- Better operator safety
- Improved compliance with workplace safety requirements
Ignoring maintenance almost always costs more than spending a few minutes cleaning the machine after each job.
Make Vacuum Maintenance Part of Every Job
Professional contractors don’t wait until something breaks.
The best operators build vacuum maintenance into their daily routine.
Think of it like cleaning your trowels or changing the oil in your ute. Five to ten minutes at the end of every day can prevent thousands of dollars in repairs.
The Golden Rule
Your H-Class vacuum should be cleaned after every single use.
Do not leave concrete dust sitting inside the machine overnight unless it is absolutely unavoidable.
Fine silica dust finds its way into every corner of the vacuum. Over time it becomes harder to remove, blocks airflow and can eventually damage expensive components.
Cleaning the machine while the dust is still fresh is quicker, easier and far more effective.
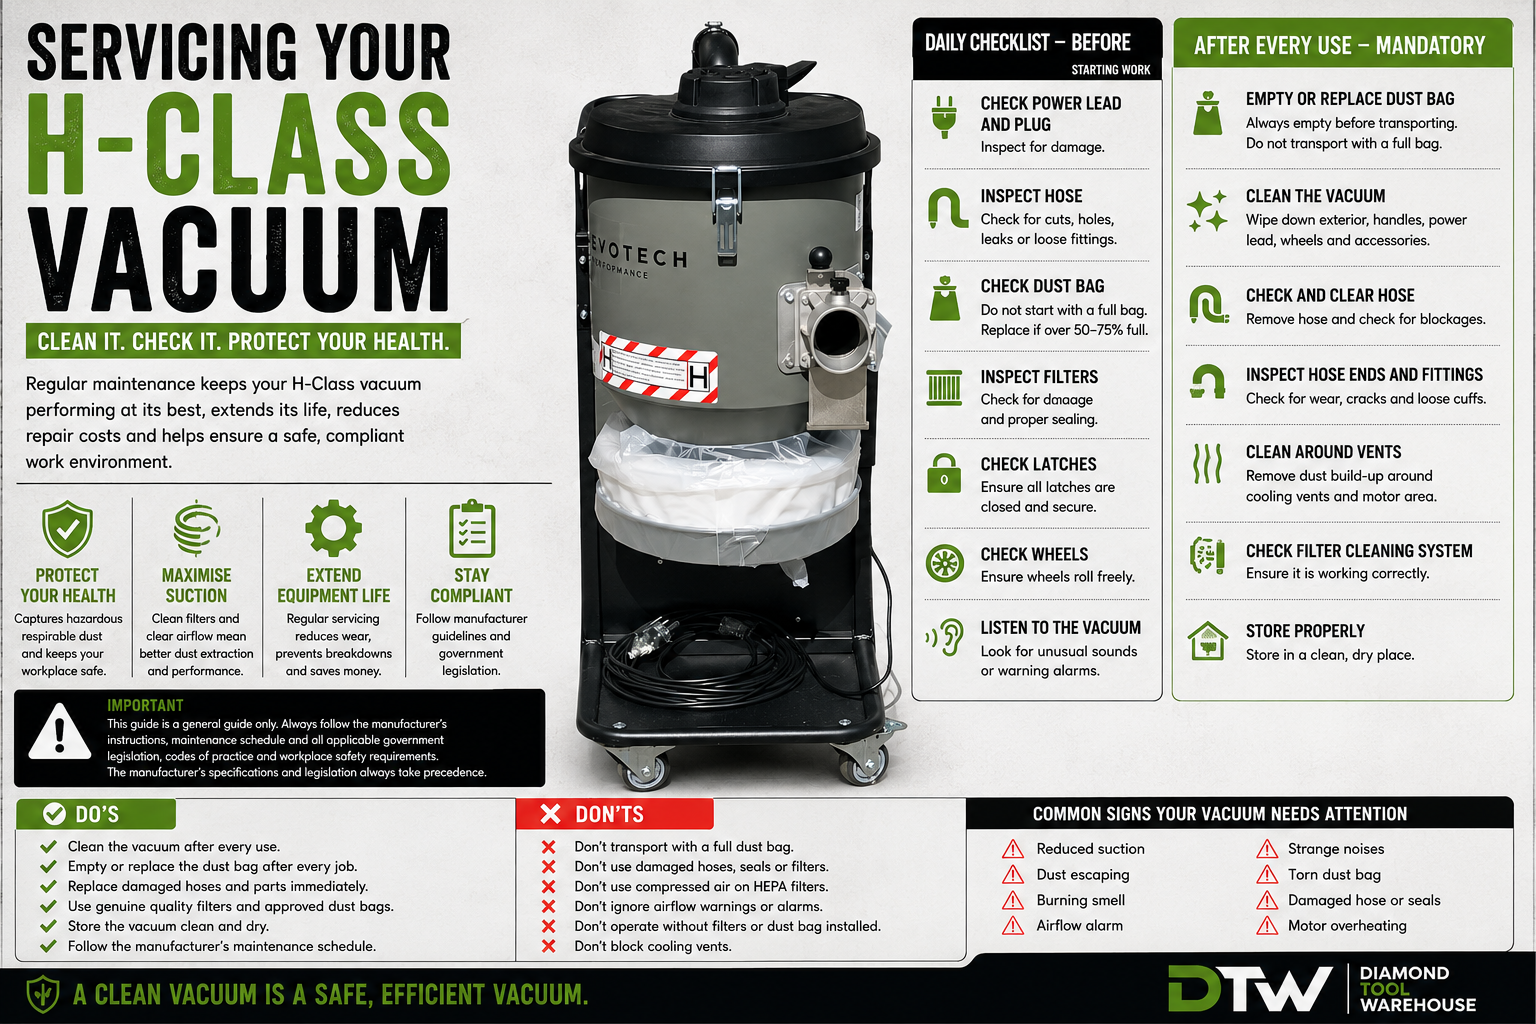
Daily Maintenance Checklist
Before Starting Work
Take two minutes before switching the vacuum on.
Check:
✅ Power lead
Look for cuts, crushed insulation or exposed wires.
✅ Plug
Ensure the plug is not damaged or loose.
✅ Hose
Check for:
- Splits
- Holes
- Loose cuffs
- Crushed sections
Even a small air leak can noticeably reduce suction.
✅ Dust Bag
Do not start the day with yesterday’s full dust bag.
If it is over half to three-quarters full, replace it before starting work.
✅ Filters
Inspect for:
- Tears
- Damage
- Poor sealing
- Excessive dust loading
✅ Latches
Ensure every latch closes properly.
Air leaks reduce airflow.
✅ Wheels
Check that castors roll freely.
Dragging a vacuum across the floor damages wheels and puts extra strain on the frame.
✅ Listen to the Vacuum
A vacuum usually tells you when something is wrong.
Listen for:
- Different motor sounds
- Whining
- Rattles
- Reduced airflow
- Air leaks
If it sounds different today than yesterday, investigate before continuing.
End of Every Job Checklist (The Most Important Part)
Many contractors simply load the vacuum into the trailer and drive away.
That is one of the biggest mistakes you can make.
1. Empty the Dust Bag
Always empty or replace the dust bag before transporting the machine whenever practical.
Why?
Every bump in the road shakes the vacuum.
This allows dust to:
- Compact into filters
- Work into seals
- Increase filter loading
- Make the next clean-out much harder
A fresh bag also means you’re ready to start work immediately the next morning.
2. Clean the Outside
Concrete dust attracts moisture.
It also scratches plastic surfaces over time.
Use:
- Damp microfibre cloth
- Soft brush
- Low-pressure cleaning methods recommended by the manufacturer
Clean:
- Lid
- Wheels
- Handles
- Power lead
- Hose
- Tool sockets
A clean machine is easier to inspect for damage.
3. Check the Hose
Disconnect the hose.
Look through it.
Small chunks of concrete can become lodged inside bends.
Blocked hoses reduce airflow dramatically.
A simple broom handle or flexible drain rod can often remove stubborn blockages (take care not to damage the hose).
4. Inspect the Hose Ends
Most air leaks occur here.
Check for:
- Loose cuffs
- Worn rubber
- Cracks
- Broken locking clips
Replacing a $20–$50 cuff is much cheaper than losing suction every day.
5. Clean Around Cooling Vents
Motors need airflow to stay cool.
Dust packed around cooling vents traps heat.
Never block these vents with tape, plastic bags or clothing during transport.
6. Check Your Filter Cleaning System
If your machine has an automatic or manual filter cleaning system:
Make sure it is working correctly.
If it suddenly becomes less effective, investigate before continuing to use the machine.
7. Store It Properly
Don’t leave your vacuum:
- Sitting in the rain
- Filled with wet slurry (unless designed for wet pickup)
- In direct weather
- Covered in concrete dust for weeks
Store it somewhere clean and dry.
Practical Tips That Save Money
Carry Spare Dust Bags
Keep several spare bags in your vehicle.
Running out usually happens on the biggest job.
Carry a Spare Hose Cuff
Hose cuffs crack more often than people realise.
Having one spare can save an entire day’s work.
Label Service Dates
Use a permanent marker or service sticker.
Write:
- Filter changed
- Motor serviced
- HEPA replaced
- Next inspection due
Everyone using the machine knows its history.
Blow Out the Outside Only
If permitted by the manufacturer, use compressed air only on the outside housing or external cooling fins, never directly on HEPA filters or in a way that could release hazardous dust into the air. Follow appropriate dust control procedures.
Keep One Vacuum Per Grinder
If possible, dedicate vacuums to particular grinders.
Constantly swapping hoses and fittings increases wear.
Replace Cheap Accessories
A leaking hose costs productivity every single day.
Premium hoses often last much longer.
Signs Your Vacuum Needs Immediate Attention
Stop using the machine if you notice:
- Burning smell
- Smoke
- Reduced suction
- Airflow alarm
- Torn dust bag
- Torn filter
- Dust escaping
- Electrical damage
- Loud bearing noises
- Cracked housing
Ignoring these signs usually turns a small repair into a major one.
The Biggest Mistakes Contractors Make
Overfilling the dust bag
Continuing to use damaged hoses
Ignoring airflow alarms
Using poor-quality replacement filters
Not cleaning the machine after every job
Running without the correct dust bag installed
Storing the machine full of dust
Blocking cooling vents
Leaving damaged seals unrepaired
Frequently Asked Questions
Should I clean my vacuum every day?
Absolutely.
Even if it appears clean, hazardous dust settles on the outside of the machine and inside key components. A quick clean after every job makes inspections easier, helps maintain performance, and reduces contamination during transport.
Should I empty the dust bag every day?
Yes, whenever practical.
Transporting a vacuum with a full dust bag allows dust to shift around inside the machine, increasing contamination of filters and making the next clean-out more difficult.
How full should the dust bag get?
Don’t wait until it is completely packed full.
Replacing the bag when it reaches roughly 50–75% capacity helps maintain airflow and reduces stress on the filtration system.
Why has my suction suddenly dropped?
Check these first:
- Full bag
- Dirty pre-filter
- Blocked hose
- Air leak
- Damaged seal
- Clogged tool
Most suction problems are simple to fix if caught early.
Can I tape up a split hose?
Only as a temporary emergency measure to finish a job if it is safe to do so.
Replace damaged hoses as soon as possible.
Can I vacuum water?
Only if your vacuum is specifically designed, configured, and approved by the manufacturer for wet collection.
Final Thoughts
Your H-Class vacuum is far more than just another piece of equipment. It is a critical safety device that protects your health, your team, and your business while helping your grinding equipment perform at its best.
Developing a simple routine—inspecting the machine before work, emptying the dust bag, cleaning the vacuum after every job, checking hoses and seals, and storing it correctly—takes only a few minutes but can save thousands of dollars in repairs and significantly extend the life of your equipment.
A clean vacuum is a more efficient vacuum. More importantly, it is a safer vacuum.
At Diamond Tool Warehouse, we stock professional H-Class dust extractors, replacement filters, dust bags, hoses, accessories, and servicing parts to help Australian contractors keep their equipment operating safely and efficiently.